Google Cloud Platform
Oodle integrates with Google Cloud Platform (GCP) to pull metrics from Cloud Monitoring. Oodle uses a service account with delegated access to query your GCP project, discover compute resources, and enrich metrics with resource labels and tags.
Prerequisites
- A GCP project with billing enabled
- Permission to enable APIs, create service accounts, and manage IAM bindings in the project
- An Oodle account (navigate to ap1, us1 to start setup)
Setup
- Open the GCP integration page in Oodle (ap1, us1), or click Settings > Integrations in the left sidebar and select the Google Cloud Platform tile.
- Click Add project (
+button) to open the setup drawer.
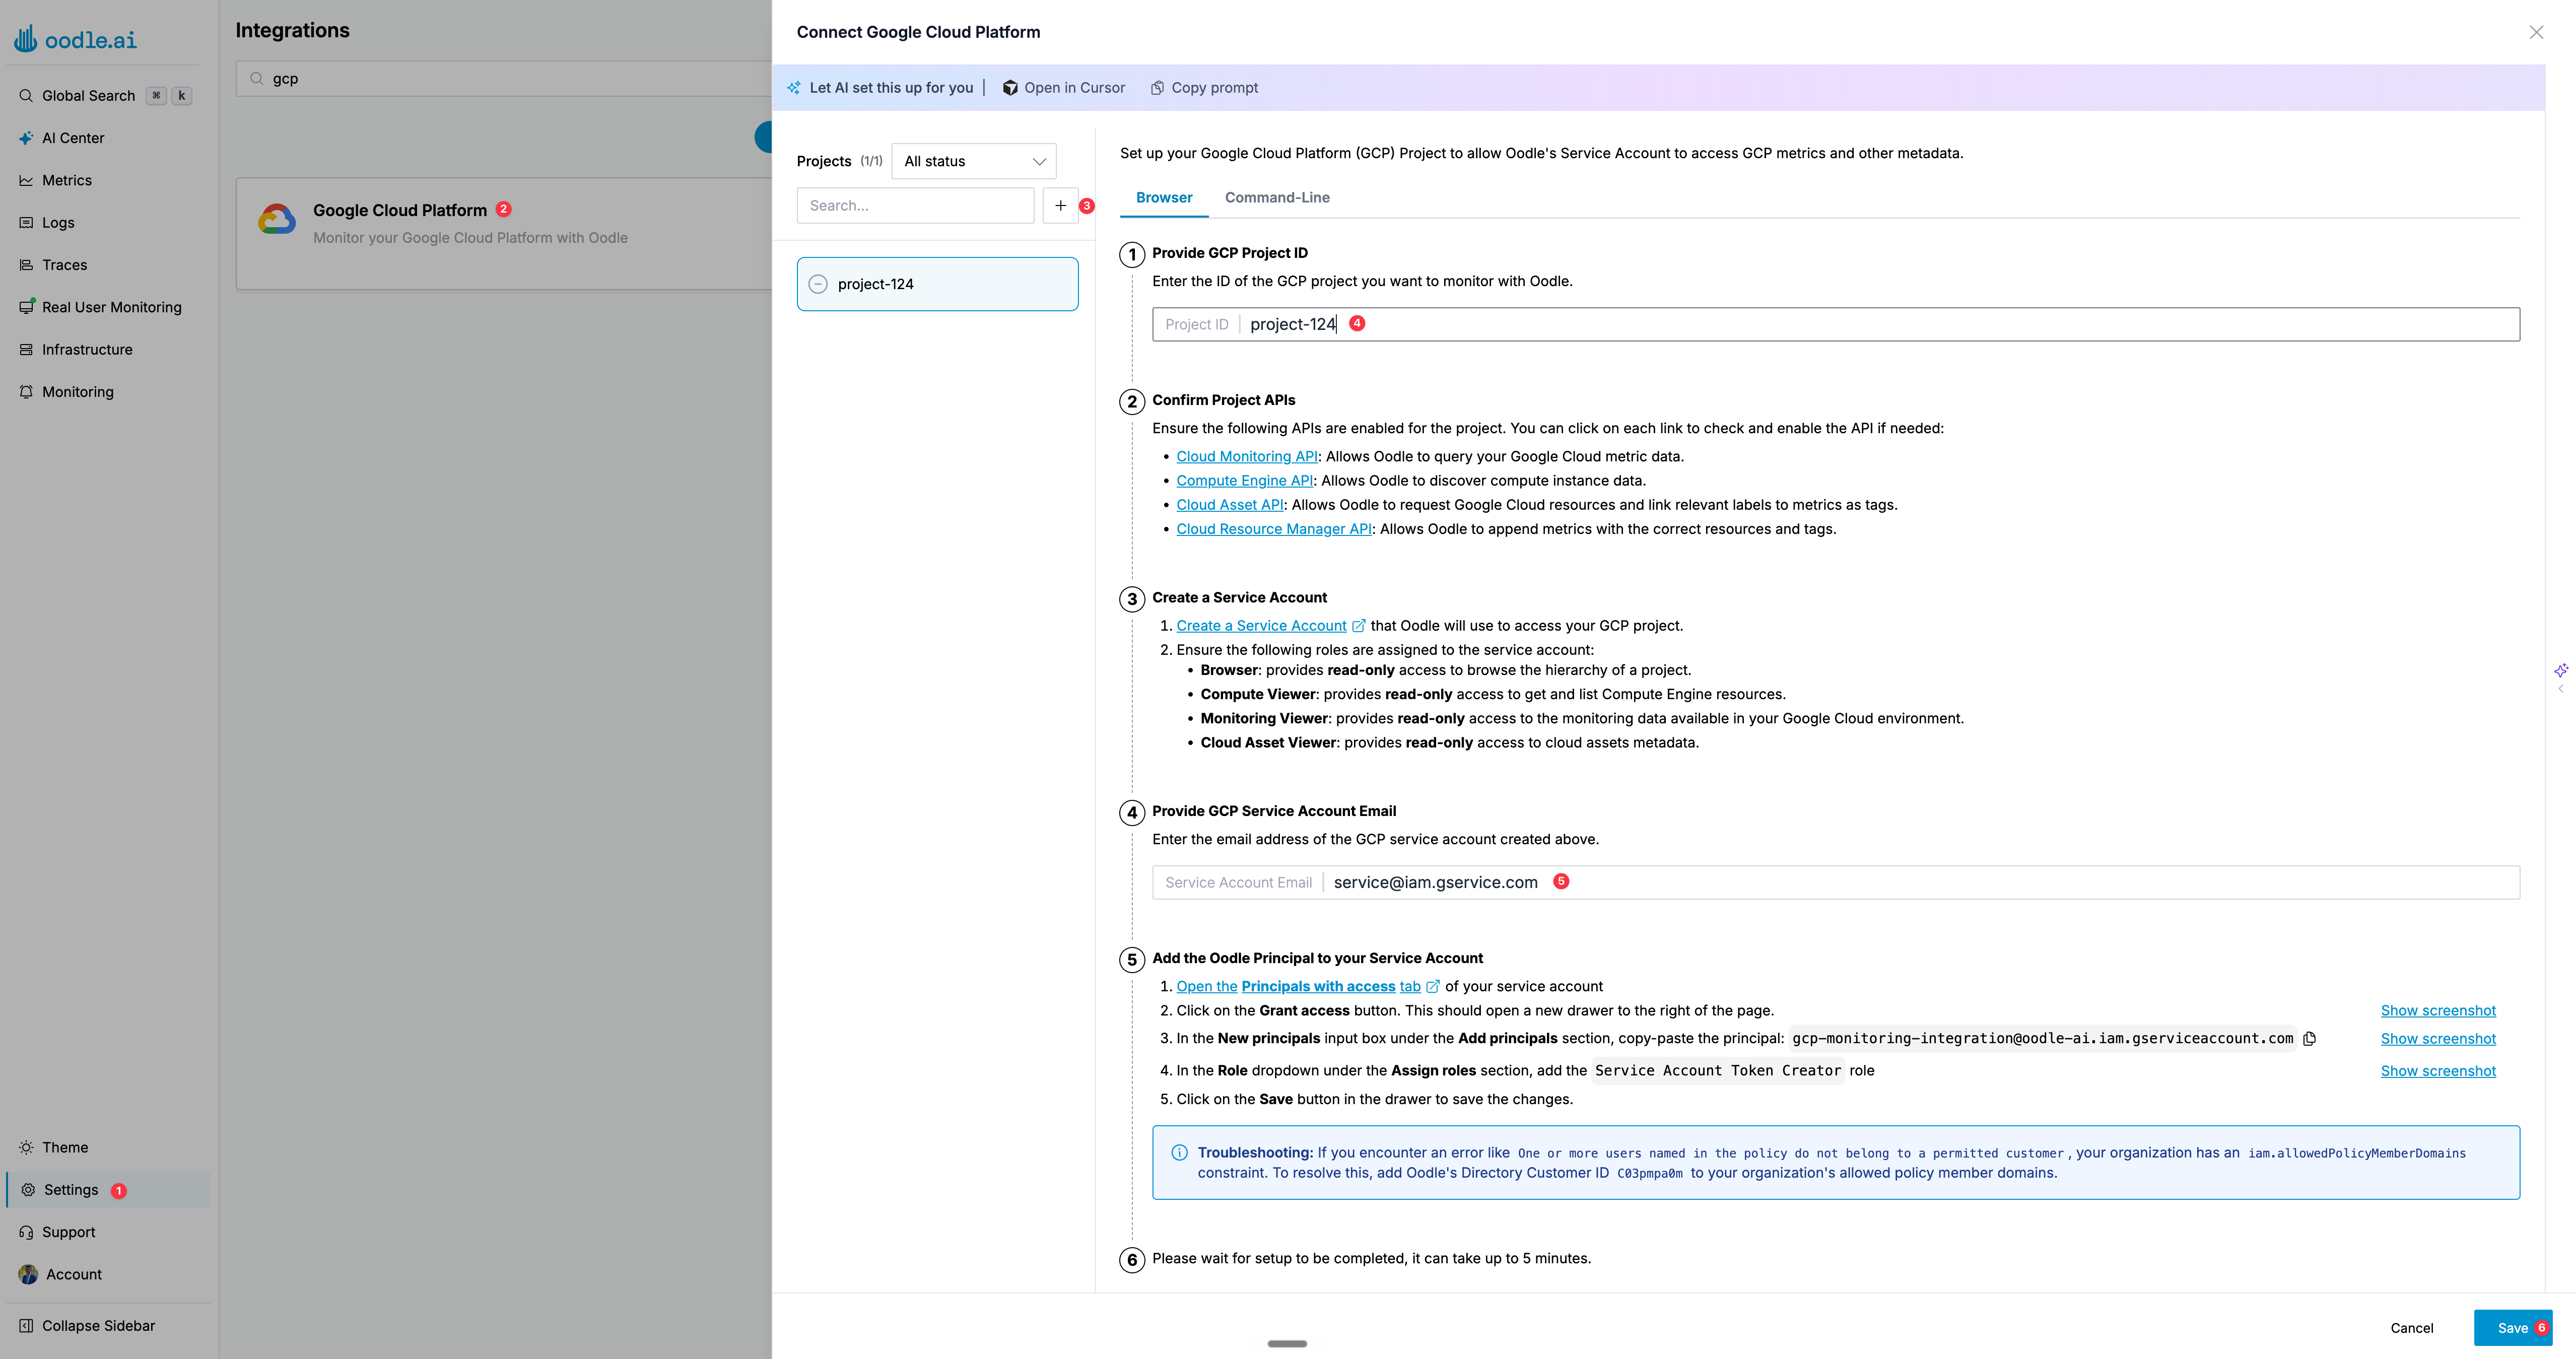
The setup drawer guides you through each step. Follow the instructions in the drawer, or use the tabs below for detailed guidance:
- Browser
- Command-Line
1. Provide GCP Project ID
Enter the ID of the GCP project you want to monitor with Oodle. You can find your project ID in the GCP Console dashboard.
2. Enable Required APIs
Ensure the following APIs are enabled for your project. You can click each link in the setup drawer to check and enable the API if needed:
| API | Purpose |
|---|---|
| Cloud Monitoring API | Query Google Cloud metric data |
| Compute Engine API | Discover compute instance data |
| Cloud Asset API | Request Google Cloud resources and link relevant labels as tags |
| Cloud Resource Manager API | Append metrics with the correct resources and tags |
3. Create a Service Account
Create a service account that Oodle will use to access your GCP project. Assign the following roles to the service account:
| Role | Access |
|---|---|
| Browser | Read-only access to browse the hierarchy of a project |
| Compute Viewer | Read-only access to get and list Compute Engine resources |
| Monitoring Viewer | Read-only access to monitoring data in your Google Cloud environment |
| Cloud Asset Viewer | Read-only access to cloud assets metadata |
4. Provide GCP Service Account Email
Enter the email address of the service account you
created in the previous step (e.g.
oodle-monitoring@YOUR_PROJECT_ID.iam.gserviceaccount.com).
5. Add the Oodle Principal to Your Service Account
- Open the Principals with access tab of your service account in the IAM console.
- Click Grant access to open the access drawer.
- In the New principals field under Add principals, paste the Oodle principal:
- In the Role dropdown under Assign roles, select Service Account Token Creator.
- Click Save.
If you see an error like "one or more users named in
the policy do not belong to a permitted customer", your
organization has an iam.allowedPolicyMemberDomains
constraint. Add Oodle's Directory Customer ID
C03pmpa0m to your organization's allowed policy
member domains.
6. Save and Wait
Click Save in the Oodle drawer. Allow up to 5 minutes for setup to complete and metrics to start flowing.
1. Install gcloud CLI
Install the Google Cloud CLI if you don't have it already.
2. Enable Required APIs
gcloud services enable \
  monitoring.googleapis.com \
  compute.googleapis.com \
  cloudasset.googleapis.com \
  cloudresourcemanager.googleapis.com \
  --project=YOUR_PROJECT_ID
3. Create a Service Account
Create a service account and grant the required roles:
gcloud iam service-accounts create oodle-monitoring \
  --display-name="Oodle Monitoring" \
  --project=YOUR_PROJECT_ID

for role in roles/browser roles/compute.viewer \
  roles/monitoring.viewer roles/cloudasset.viewer; do
  gcloud projects add-iam-policy-binding YOUR_PROJECT_ID \
    --member="serviceAccount:oodle-monitoring@YOUR_PROJECT_ID.iam.gserviceaccount.com" \
    --role="$role"
done
4. Grant Oodle Principal Access
Grant the Oodle service account the Service Account Token Creator role on your service account:
gcloud iam service-accounts add-iam-policy-binding \
  oodle-monitoring@YOUR_PROJECT_ID.iam.gserviceaccount.com \
  --member="serviceAccount:[email protected]" \
  --role="roles/iam.serviceAccountTokenCreator" \
  --project=YOUR_PROJECT_ID
5. Enter Service Account Email and Save
Back in the Oodle setup drawer, enter the service account email and click Save. Allow up to 5 minutes for setup to complete and metrics to start flowing.
If the add-iam-policy-binding command fails due to an
iam.allowedPolicyMemberDomains constraint, add
Oodle's Directory Customer ID C03pmpa0m to your
organization's allowed policy member domains.
Verification
Once setup is complete, verify the integration is working:
- Navigate to ap1, us1 and confirm the project status shows as connected.
- Go to ap1, us1 and search
for metrics prefixed with
gcp_to confirm data is flowing.
Troubleshooting
| Issue | Resolution |
|---|---|
| No metrics appearing after 5 minutes | Verify all four APIs are enabled in the GCP project |
| Permission denied errors | Check that the service account has all four required roles |
| Token creation failures | Ensure the Oodle principal has the Service Account Token Creator role on your service account |
| Organization policy blocks external principals | Add Directory Customer ID C03pmpa0m to iam.allowedPolicyMemberDomains |
How Oodle collects GCP metrics
Polling interval
Oodle polls the Cloud Monitoring API on a recurring interval - every 5 minutes by default. To adjust this interval, reach out to Oodle Support.
A shorter polling interval increases the number of API calls made to GCP, which affects your Cloud Monitoring API costs. Note that reducing the polling interval below a metric's native alignment interval (see below) will have no impact - GCP will not have new data points to return more frequently than the metric is emitted.
GCP metric alignment intervals
Different GCP services emit metrics at different native intervals. For example, Compute Engine CPU metrics are reported every 60 seconds, while some managed-service metrics (such as Cloud SQL or Cloud Storage) may only update every 5 or 10 minutes. Oodle requests data aligned to each metric's native interval so no data points are missed or double-counted.
Expected data delay
Because of the combination of Oodle's polling interval and GCP's own metric publication delay, metrics typically appear in Oodle approximately 5 minutes after they are recorded in GCP. This delay is normal and applies to all polling-based integrations.
Custom metrics
If you are sending custom metrics to GCP and want them available in Oodle without the polling delay, consider writing those metrics directly to Oodle instead. See the other metrics integrations for options on sending data to Oodle directly.
Support
If you need assistance or have any questions, please reach out to us through:
- Email at [email protected]